How to enable DKIM for your domain
What Is DKIM?
DKIM is an email authentication method designed to protect your domain against email spoofing, a type of email attack commonly used in phishing or email spam. Email spoofing occurs when an email is created with a forged ‘From’ address.
Enabling DKIM will drastically reduce the chance of your email being identified as spam by the recipient.
By following this guide, you will be able to enable DKIM for your domain with a few easy steps.
Note: Our Auth SMTP must be active for your domain to use this service. If you have yet to activate Auth SMTP or are not sure if you have, please follow the guide in the link below then return here:
Activate Authenticated SMTP
How to Enable DKIM
Before you begin, ensure that you are using our nameservers, as DKIM is only supported when our nameservers are in use. To check your current nameserver provider, follow this guide: How to check your nameserver provider.
If you are not using our nameservers, we recommend contacting our support team for assistance with enabling DKIM.
First you will need to login to your Online Control Panel. If you aren’t sure how to do this, follow the link below and then come back to this page:
How to Access Your Online Control Panel
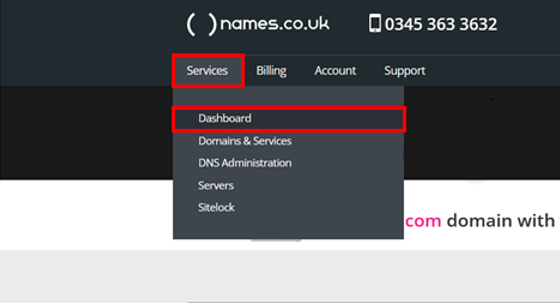
Now that you are logged in, you will need to hover over Services which will bring up a drop-down menu where you will need to select Dashboard as shown below:
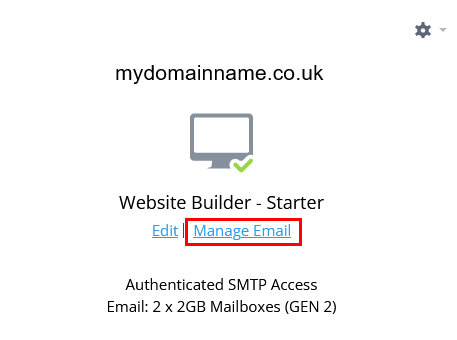
Now that you are on your dashboard you will need to find the domain that you would like to enable DKIM for and click Manage Email.
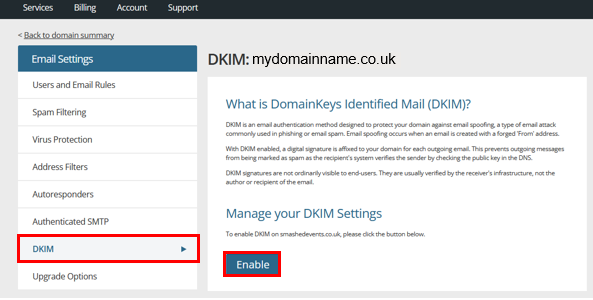
Clicking manage email will bring up a new screen with a menu on the left of the page. Click on the option for DKIM and this will bring up a panel on the right detailing the function of DKIM. Below, there is an option to Enable the service. Click this button and the DKIM setup will begin automatically.
Note: As DKIM updates your DNS, you will need to ensure that your nameservers are with us for this process to be automated. Also, please be aware that the service will take up to 48 hours to come into effect as it will be subject to DNS propagation.
And that’s all you need to do. Your DNS will be updated by our system and DKIM will now be enabled for all email users on your domain.
Why This Article Also Mentions SPF
While this article focuses on DKIM, modern email authentication relies on multiple checks working together. DKIM alone does not confirm whether the mail server sending an email is authorised to send on behalf of your domain.
For this reason, we also reference SPF (Sender Policy Framework) in this article to provide a complete understanding of how email authentication works.
- DKIM verifies the integrity of the email content
- SPF verifies that the sending mail server is authorised
If DKIM is configured without SPF, emails may still fail authentication checks or be treated as suspicious by receiving mail servers. Explaining both standards helps ensure you understand why DKIM should not be configured in isolation and what additional steps may be required to improve email deliverability.
How DKIM Works with SPF
DKIM authenticates the content of an email, but it does not verify whether the sending server itself is authorised. This is handled by SPF (Sender Policy Framework).
- SPF validates the sending mail server
- DKIM validates the integrity of the message
- Together, they provide a complete authentication setup
If DKIM is enabled without SPF, emails may still fail authentication checks. For best results, both SPF and DKIM should be configured.
Do I Still Need SPF If DKIM Is Enabled?
Yes.
DKIM does not replace SPF.
- SPF confirms the sending mail server is authorised
- DKIM confirms the email content is authentic
Most receiving mail servers expect both SPF and DKIM to be present. Missing either may result in emails being rejected or delivered to spam.